Hug Your Home Challenge Tag

  • Sort Blog:
  • All
  • About The Property Geeks
  • Around Town
  • Buying
  • Design
  • Downtown Lakeville
  • Home and Garden
  • Home Staging
  • Hug Your Home Challenge
  • Market
  • Open House
  • Photography
  • Real Estate Investment
  • Recipes
  • Selling
  • Uncategorized

Hug Your Home Challenge – June Tips

If you’ve been keeping up with The Property Geeks 2018 Hug Your Home Challenge then you know we’re now halfway through the year! If you haven’t been keeping up, it’s not too late to join in. Click here to get your free Hug Your Home Challenge checklist, a year full of home maintenance tips that will get your house in tip top shape. This month we’re kicking off summer so we’re going pretty easy on you.

Tweak Your Squeaks

For June, we’re checking hinges on cabinets and doors for pesky squeaks. Fixing an annoying noise can be as simple as spraying a little WD-40 on the hinge. If you don’t have WD-40 on hand, don’t fret. You can also use any number of items you’ve probably got sitting around the house. A bar of soap can be applied to a noisy hinge. Or you could use wax, petroleum jelly, olive oil or another kind of cooking oil, or even butter. The bottom line is… don’t suffer. If you’ve got a squeak, take the time to tweak it.


Revitalize Your Deck

Decks take a beating, especially here in Minnesota. Between the sun, the rain and the snow, it’s not unheard of for homeowners to have to refinish their deck every couple of years.

First, evaluate the condition of the deck. If the boards are in good shape you probably just need a deep cleaning and possibly a refinish. If boards are cracking or split, make those repairs first.

Next, use a deck cleaner to remove any dirt, stains or mildew. Follow the instructions on the label for application. Once the cleaner is ready to remove, consider using a pressure washer.

Tip: Make sure you use the right nozzle. Using one of the smaller ones can actually do more harm than good.

Once you’ve got a clean, even surface, decide on a stain or sealant. If the wood is in good shape, you might just need a clear layer of protection. Most homeowners opt for a little color which might mean a semi-transparent stain that lets the grain of the wood show through. If the wood is in rough shape there are products that provide more coverage and look almost like paint. Follow the manufacturer’s instructions on whichever product you choose.

Tip: Make sure you check the weather forecast before applying stain. Most products will need to dry for a period of time before they should be exposed to water.

Mend Your Fences

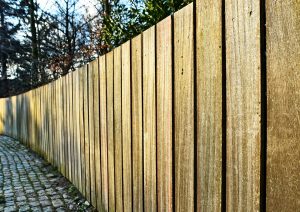
As long as you’re cleaning and restaining the deck, you may as well take a look at the fence, too. Replace any rotted or cracked boards and make sure there aren’t any nails or screws sticking out. Fences typically don’t need to be stained or sealed as often as decks since the surface is vertical and isn’t exposed to foot traffic. A good powerwashing will clean off any dirt and debris. Fences can be sealed or stained with the same type of products you’d use on your deck.

Tip: To extend the life of your fence, keep the sprinklers from hitting it and trim any vines away. Any type of moisture will make the wood deteriorate faster.


Tackling these big projects early in the summer means plenty of relaxing summer weekends ahead! And if you’re not up for doing the work yourself, there are probably plenty of students or local businesses who would be willing to take on the task. We want to see your projects. Feel free to tag The Property Geeks on Facebook or Instagram so we can track your progress!

Hug Your Home Challenge – May Tips

If you’ve been keeping up with The Property Geeks 2018 Hug Your Home Challenge then you know we’re almost halfway through the year! If you haven’t been keeping up, it’s not too late to join in. Click here to get your free Hug Your Home Challenge checklist, a year full of home maintenance tips that will get your house in tip top shape. This month it’s all about freshening everything up for Spring.

Freshen Up Your Fan & Filter

How long has it been since you’ve shown your oven hood some love? If your filter looks more yellow than silver and you can’t find a non-sticky place to hold onto, it’s probably time to give it a quick bath. If you’ve got a stainless steel filter, you can just pop it in the dishwasher with your next load. Unfortunately, if your filter is made from aluminum, (as many of them are) you’re going to want to opt for handwashing.

  1. Fill the sink with hot, hot, hot water.
  2. Add 1/4 cup of baking soda and a generous squirt of de-greasing dishsoap like Dawn.
  3. Remove your filter from the vent hood. Most will pop or slide out pretty easily. Submerge it in the hot, soapy water.
  4. Pour yourself a glass of iced tea while the filter soaks. (10-15 minutes at a minimum. More if you’re reading a good book.)
  5. After it’s soaked, scrub the filter with a scrub brush, being careful not to damage it.
  6. Rinse and air dry, then re-install. (Make sure it’s completely dry before you put it back in the vent hood.)

Rejuvenate Your Refrigerator

Hopefully you go through and toss out science projects growing in your refrigerator on a fairly regular basis. But how about giving your fridge and freezer a nice, deep clean? It doesn’t take too much effort and you’ll be thankful for the results since you’ll be able to tell what you’ve got stashed away in there. To give your fridge and freezer a quick, more thorough clean:

  1. Remove everything, including drawers, shelves and bins.
  2. Fill your sink with hot water and a generous squirt of liquid dish soap.
  3. Soak shelves, drawers, etc. in the sink.
  4. Use a soapy rag to wipe down the shelves, sides, and inside door of your refrigerator. If you come across sticky or stubborn spills, mix some baking soda with some water and scrub the spill with that mixture.
  5. Wipe away any remaining soap with a wet rag.
  6. Dry the interior.
  7. Scrub, rinse and dry the shelves, drawers and bins.
  8. Put your food back in place and enjoy!

Wash those Windows

Nothing makes the day a little brighter than having the sun peer in through sparkly, clean windows. In order to tackle this project, you’ll want to wait for a clear day with no chance of rain. Before you do anything else, make sure you mark the window screens. Trying to figure out which screen came from which window isn’t a fun game to play and will add hours to your chore. Then:

  1. Remove screens from all of the windows and lay them flat on a tarp.
  2. With a gentle setting, spray down all of the screens with a hose.
  3. Add a squirt of dish soap and gently scrub the screens with a scrub brush.
  4. Rinse again and let air dry.

Meanwhile, for the windows…

  1. Mix up a solution of 4 cups of water, 1/2 cup of vinegar and a small squirt of dish soap.
  2. Spray on the windows.
  3. Rinse off.
  4. Use a squeegee to wipe it off. If you can’t reach, air drying is fine.
  5. Presto! Now you can actually see outside!

Sign up here for more Hug Your Home Challenge tips and also check in on our weekly episode of #GrillTheGeeks on our Facebook page where we talk about everything going on in the real estate market plus tips for keeping your home in tip top shape!

Hug Your Home Challenge – April Tips

Are you ready for Spring yet? Up here in Minnesota we’ve been ready for weeks but Mother Nature isn’t giving us a break! Hopefully we’ll get some warmer weather soon so we can check off the items on April’s Hug Your Home Challenge. If you’re new to the challenge, you can sign up here. We’ll send you a checklist you can use to keep up with your home maintenance all year long. Plus, each month we’ll send you info on that month’s checklist so you’re hugging your home all year long. As for April’s tips, here are a few that will help you get those tasks done in no time at all.

“Unclutter Your Gutters”

Before the spring rains start, take the time to make sure your gutters are clear. You’ve probably got everything  you need on hand: a ladder, a plastic scoop, a hose and a tarp (optional).

  1. Spread the tarp out on the area below where you’re cleaning to catch the debris.
  2. Set up your ladder to start at the far end of a section. Use the scoop to clean out any leaves, pine needles or twigs from the gutter. With the tarp protecting your landscaping, feel free to toss it down below.
  3. Once you’ve got a section done, use a hose to flush out any remaining debris.
  4. You’ll also want to check your downspouts to make sure they’re still directing water away from your foundation.


“Care About Your Air”

It might seem like it will be forever before you need to turn on the air conditioning, but before you know it, you’ll be flipping that switch. The last thing you want is to find out your unit had gone kaput. Make sure your air conditioner is ready to go by performing some easy maintenance.

  1. Check your filter. If it’s clogged or dirty, replace it.
  2. Inspect your outdoor unit and remove any leaves or other obstructions. You can do this by turning off the power and rinsing the unit with a hose or using a ShopVac to suck out the debris.
  3. Make sure all of the air vents inside are open and free of obstructions. Some people believe if they close the vents to a room it will save the air conditioner from having to keep the whole house cool. On the contrary, closing vents forces your unit to work harder so make sure they’re not covered by furniture, drapes or anything else.


“Check Below Deck”

The change of seasons can wreak havoc on a Minnesota basement. Once the snow and ice starts to melt, it will flow wherever it can find a way. Unfortunately, often that means it finds a way into your basement. You can check for moisture a few different ways:

  1. Sometimes it’s as easy as using your nose. If your basement has taken on a musty, moldy smell over the winter, odds are you’ve got some kind of moisture.
  2. Cut a square of plastic wrap (about 12″x12″) and tape it to your concrete floor. Make sure you cover all of the edges so it’s airtight. If you come back in a day or two and notice condensation or moisture under the plastic, you’ve got an issue with a damp basement.
  3. Try using a moisture meter. Make sure you measure in several areas of the basement and at many different heights.
  4. Your fix for moisture in the basement will vary depending on the source. To help keep water from entering, make sure your foundation plantings drain away from the house, not toward it and that your gutters and downspouts are directing water away from the house.

Hopefully our tips will help you get ready for Spring… when and if it ever arrives!

Hug Your Home Challenge – March Tips

Two months down and only ten to go in The Property Geeks 2018 Hug Your Home Challenge. We’re working our way through a year full of home maintenance tips and tricks. If you haven’t signed up, there’s still plenty of time. Join in here!

If you’ve been keeping up, it’s time to tackle March’s list right now. We’ve got a few tips and tricks to take on those tasks. Let’s get started with one of our least favorite jobs… cleaning out the oven!

“Give Your Oven Some Lovin'”

Do you know anyone who loves to clean their oven? Sure, they enjoy it once it’s clean, but does anyone ever look forward to scraping the baked on goo and grime off the bottom of their oven? If you know of someone, send them our way! For the rest of you, this is one chore where the anticipation is actually worse than going through the motions. Follow these steps and your oven will sparkle with minimal effort:

Oven

  1. Fill your bathtub or a large basin with warm water and a scoop of dishwasher detergent. (If you’re using your bathtub, you may want to put an old towel down first so it doesn’t get scratched.)
  2. Remove your oven racks from the oven and let them soak for several hours in the tub.
  3. Make a paste with baking soda and water.
  4. Spread the paste over the inside of your oven with a nylon scrubber or sponge.
  5. Let it sit for several hours or overnight.
  6. Wipe off the dried paste with a wet sponge.
  7. Scrub the oven racks, rinse and let dry before returning them to the oven.


“Return the Spring to Your Shower”

Even if you don’t have hard water, mineral deposits and sediment can build up on your shower head. Your water pressure can be affected and you might even see a rogue stream of water shooting off in a random direction. Never fear. Cleaning off your shower head is super easy and you probably already have everything on hand.

  1. Fill a plastic bag with white vinegar.
  2. Slip the bag over your shower head, making sure it’s submerged in the vinegar, and secure in place with a rubber band or tape. (Make sure you don’t get tape on the metal.)
  3. Leave in place overnight.
  4. Remove the bag and scrub around the shower head, especially the holes, with an old toothbrush.
  5. Run clear water to rinse and ta-da — you’ve got a sparkly, free-flowing shower!

“Clean Up Those Coils”

Refrigerator

Your refrigerator is probably one of the hardest working appliances in your home. It doesn’t require much maintenance, but if you can remember to dust or vacuum the coils every so often, it will improve the efficiency of this much-loved appliance. The first step to cleaning up those coils is to figure out where they are. Typically, coils are located in a massive grid on the back of the refrigerator. If that’s the case with your model, simply unplug it from the wall then gently vacuum or dust any build-up from the coils. Some models may have the coils on the bottom. Again, unplug your appliance from the wall then look for either a plate in front of the refrigerator or one in back. Remove the cover and carefully dust or vacuum the coils. Once your refrigerator is dust-free you can plug it back in and pat yourself on the back for crossing another home maintenance task off your list.

Be sure to join us on our Facebook page where we’ll share other tips and tricks for tackling your home maintenance tasks! Until next time, keep hugging your home!

Hug Your Home Challenge – January Tips

If you’ve been keeping up with The Property Geeks you’ve probably heard us talk about the 2018 Hug Your Home Challenge. It’s a chance for all of us to stick together through a year full of home maintenance tips and tricks. If you haven’t signed up, there’s plenty of time. Join in here! For those of you following along, we’re working through January’s list right now. It’s full of exciting things like “Clean Your Ceiling Fan Blades” and “Touch Up Interior Paint.” If you’re like us, you know those things are important to do, but not exactly the most desirable way to spend an hour of free time. We’ve got some tips here on how you can knock off a good portion of our checklist as quickly and easily as possible. Let’s start with the dreaded garbage disposal…

“Ooooh, What’s that smell?”

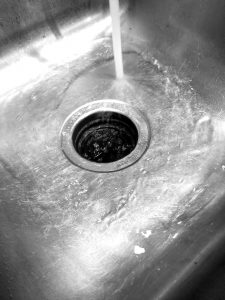
Ever notice a funky little smell drifting up from your kitchen sink? Maybe it’s that tuna melt sandwich you just put down the drain. Or maybe it’s time to show your hardworking garbage disposal some love. There are many ways to clean the garbage disposal and if you do a quick search on Pinterest you’ll be bombarded with options. Our best advice comes from Property Geek Karla who suggests the following:

  1. Slice up a lemon and send it down the disposal.
  2. Follow that with a cup of ice.
  3. Next, measure out a cup of vinegar and pour it down the sink.
  4. Presto! You’ve got a sweet-smelling disposal.


“Don’t Hit a Wall with the Walls!”

Do your walls and baseboards have a magnetic-like attraction to dust and grime? There are several different ways to fight back, depending on the level of effort you want to put forth. Here are a couple of ideas:

  1. Dust your walls with a microfiber mop.
  2. Mix up a batch of ammonia and water then wipe down the walls and baseboards with a damp cloth.
  3. Use a Magic Eraser for stubborn stains or marks but be careful — it might remove the paint finish.
  4. Use a toothbrush or cotton swab to get into the corners and tight spots on your baseboards.
  5. To cut down on future work, run a dryer sheet over your baseboards. It will repel dust.


“Shower your Shower Curtain with Love”

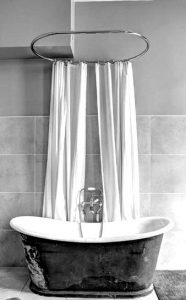
Do you ever get the feeling it would be better to go with a gray shower liner instead of battling the mildew that collects on that once-pristine white one? The battle against mildew and mold can be won. Just wash your shower curtain with salt. Salt? Yep. Regular table salt will do the trick. Here’s how:

  1. Toss your shower curtain, liner and a couple of towels into the washing machine.
  2. Use 1/2 the amount of detergent and toss in a cup of vinegar or use the regular amount of detergent with 1/2 cup of baking soda and 1/2 cup of vinegar during the rinse cycle.
  3. Add a cup of salt to a tub of water and soak shower curtain/liner for several hours.
  4. Hang to dry.
  5. No more mold and mildew!


Enjoying our tips? Sign up here for our 2018 Hug Your Home Challenge and get our annual checklist plus monthly reminders of “to-do’s.” You can also follow us on Pinterest where we’re pinning our favorite tips. And make sure you join us at 12pm CT on our Facebook page for #GrillTheGeeks. Every Thursday we talk about home buying and selling and answer your real estate questions. This week Property Geek Karla will be talking about more home maintenance tips you can use to knock off that January checklist!