tips Tag

  • Sort Blog:
  • All
  • About The Property Geeks
  • Around Town
  • Buying
  • Design
  • Downtown Lakeville
  • Home and Garden
  • Home Staging
  • Hug Your Home Challenge
  • Market
  • Open House
  • Photography
  • Real Estate Investment
  • Recipes
  • Selling
  • Uncategorized

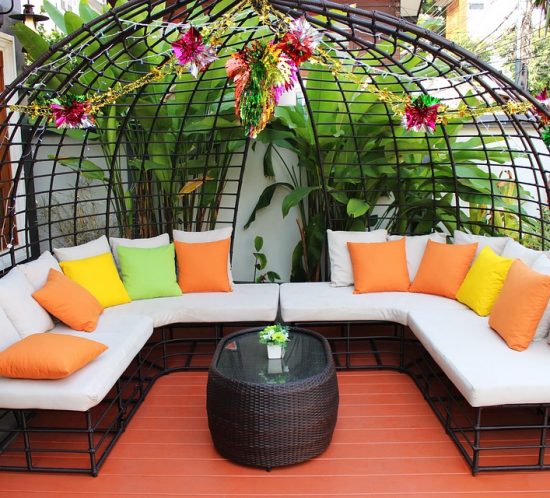
5 Types of Outdoor Furniture That Last

As summer heats up, you’ll want to make sure your patio furniture is in tip top shape to maximize your enjoyment of the great outdoors. But what if you settle onto that furniture and hmmm…it doesn’t look nearly as nice as it once did? Well, you’re in luck because today there are dozens of choices for new outdoor patio furniture that will have your outdoor living spaces looking and feeling cozy and welcoming for both you and your guests.

Your choice in outdoor furniture is important, as you probably spend a lot of time on it during the summer months. It makes sense, then, to choose comfortable styles and fabrics, while still keeping in mind the care and maintenance needs of furniture. The first thing you should do is think about how you use your outdoor areas. Do you hold big parties for many people, or do you have more small, intimate cookouts? Do you do most of your cooking outdoors during the summer? These are important questions to ask when you’re considering new furniture purchases.

Below we have categorized a few of the most attractive choices for patio furniture, both by aesthetics and by their ease-of-maintenance. Use this as your guide when you go shopping.

1. Wrought Iron Furniture

Wrought iron is classic, sturdy, and timeless-looking. If you live in an area of high winds, you won’t have to worry about your patio furniture blowing away. There are so many styles, colors, and designs with wrought iron that it is sure to fit your style, no matter what that might be. But don’t plan to use this type of outdoor furniture if you’ll be moving pieces around a lot. They are hefty and will leave marks if dragged across the deck.

Because the paint on wrought iron can chip, see if there is a touch-up paint in the same color available to purchase when you buy your set of furniture. You’ll be able to use the touch up anytime you find scratches or chips, and it’ll keep your furniture looking like brand new. To clean, just wipe down with a damp cloth. If deeper cleaning is necessary, wipe down with a solution of dishwashing detergent and warm water, and then rinse with your garden hose.

2. Aluminum Furniture

Aluminum patio furniture is great if you want an easy-care solution that you can effortlessly move around. Aluminum won’t rust, and it’s super lightweight. Choose cushions that you can easily replace, as the aluminum frame will probably significantly outlast your cushions. When you’re shopping, make sure that the hardware on your furniture is rust-proof, and choose a powder-coated, UV-resistant finish. Check the welds to make sure they are seamless, and look sturdy.

To clean aluminum furniture, just wipe it down with a damp cloth. If you see scuff marks, you can very gently use a bit of Soft Scrub on a soft, damp cloth, but be careful – you don’t want to scratch the finish, especially if it’s shiny. And never use abrasive cleaners on aluminum. Rinse off with your garden hose.

3. Polymer and Plastic Furniture

If easy care and maintenance are what you’re looking for, synthetics are where it’s at. Plastic patio furniture created from recycled plastics are fantastic if you live in a saltwater environment. This furniture can’t ever rust and is designed to last in difficult environments. Marine-grade polymers can also be used. They’re heavy, sturdy, and have been designed to look just like painted wood. You can leave this furniture out all year round without any ill effects, and cleaning is easy with a simple dish soap and water solution and a damp cloth. Rinse with your garden hose.

4. Real Wood Furniture

The type of wood your furniture is made of is crucial if you want to avoid things like splitting, rotting, and bugs. You want dense wood such as teak or eucalyptus, or a hardy wood such as cedar. Teak and Eucalyptus are easier to maintain because they don’t need to be sealed on a yearly basis, but cedar is naturally moisture- and bug-resistant.

Clean your wood furniture with a soft brush and a solution of water and Murphy’s Oil Soap. Hose down well and dry with shop towels.

5. Cushion Fabrics

Choosing new cushions is a great way to make older furniture look new again. They can also be the most pricey part of your patio set, so make sure you choose wisely!

If price is no object, look for fabric designed for outdoor use that is UV-resistant, as well as resistant to moisture, mold, and stains. And bring your cushions indoors when you’re not using them – you’ll get much more life out of your investment.

Hug Your Home Challenge – June Tips

If you’ve been keeping up with The Property Geeks 2018 Hug Your Home Challenge then you know we’re now halfway through the year! If you haven’t been keeping up, it’s not too late to join in. Click here to get your free Hug Your Home Challenge checklist, a year full of home maintenance tips that will get your house in tip top shape. This month we’re kicking off summer so we’re going pretty easy on you.

Tweak Your Squeaks

For June, we’re checking hinges on cabinets and doors for pesky squeaks. Fixing an annoying noise can be as simple as spraying a little WD-40 on the hinge. If you don’t have WD-40 on hand, don’t fret. You can also use any number of items you’ve probably got sitting around the house. A bar of soap can be applied to a noisy hinge. Or you could use wax, petroleum jelly, olive oil or another kind of cooking oil, or even butter. The bottom line is… don’t suffer. If you’ve got a squeak, take the time to tweak it.


Revitalize Your Deck

Decks take a beating, especially here in Minnesota. Between the sun, the rain and the snow, it’s not unheard of for homeowners to have to refinish their deck every couple of years.

First, evaluate the condition of the deck. If the boards are in good shape you probably just need a deep cleaning and possibly a refinish. If boards are cracking or split, make those repairs first.

Next, use a deck cleaner to remove any dirt, stains or mildew. Follow the instructions on the label for application. Once the cleaner is ready to remove, consider using a pressure washer.

Tip: Make sure you use the right nozzle. Using one of the smaller ones can actually do more harm than good.

Once you’ve got a clean, even surface, decide on a stain or sealant. If the wood is in good shape, you might just need a clear layer of protection. Most homeowners opt for a little color which might mean a semi-transparent stain that lets the grain of the wood show through. If the wood is in rough shape there are products that provide more coverage and look almost like paint. Follow the manufacturer’s instructions on whichever product you choose.

Tip: Make sure you check the weather forecast before applying stain. Most products will need to dry for a period of time before they should be exposed to water.

Mend Your Fences

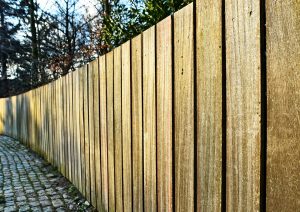
As long as you’re cleaning and restaining the deck, you may as well take a look at the fence, too. Replace any rotted or cracked boards and make sure there aren’t any nails or screws sticking out. Fences typically don’t need to be stained or sealed as often as decks since the surface is vertical and isn’t exposed to foot traffic. A good powerwashing will clean off any dirt and debris. Fences can be sealed or stained with the same type of products you’d use on your deck.

Tip: To extend the life of your fence, keep the sprinklers from hitting it and trim any vines away. Any type of moisture will make the wood deteriorate faster.


Tackling these big projects early in the summer means plenty of relaxing summer weekends ahead! And if you’re not up for doing the work yourself, there are probably plenty of students or local businesses who would be willing to take on the task. We want to see your projects. Feel free to tag The Property Geeks on Facebook or Instagram so we can track your progress!

The Lifespan of 20 Essential Household Items

Has your air conditioner ever failed on a hot summer day? It’s a struggle no homeowner wants to deal with. When you own a home it’s important to budget annually for repairs that might be needed and anticipate when things might need to be replaced.

If you take care of your home, your appliances and fixtures should last longer. This means keeping them clean, performing regular maintenance and preventing unnecessary wear.
Even the most well-kept homes will need repairs at some point and it helps to know how long you should expect your items to last. We’ve put together a list of how long certain household fixtures and appliances should hold up.

Check out each of the rooms below!

Exterior:

Fixtures outside your home can suffer the most wear and tear of anything you own because they are constantly exposed to the elements. However, they are usually some of the most sturdy and are typically built to last. These are the items you will likely have to pay more for but luckily not as often.

  • Window Unit Air Conditioner: 10 Years

The typical window unit air conditioner can last anywhere from 8–12 years depending on how much it’s used and how well it’s taken care of. Be sure to turn the unit off when it’s not needed and clean the air filter often.

  • Garage Door: 12 Years

You can expect 10–15 years of reliable service from a garage door depending on how often it’s used. To prolong its life, apply lubricant spray to door springs every three to six months.

  • Siding: 30 Years

Siding can last anywhere from 20–40 years depending on the material used, weather conditions in your area and how well it’s taken care of. For instance, aluminum siding will last 15 years but needs to be repainted when it fades every five or so years.
Wood siding that is painted or stained every five years should last decades. But vinyl siding is a popular choice because it can last up to 40 years and is virtually maintenance free!

No matter what material you use to keep your siding clean to prevent dirt and mildew that can shorten its lifespan.

  • Roofing: 25 Years

Most homeowners will need to re-roof their house every 20–30 years, although the type of shingles you use will impact this number. A metal roof can last even longer, up to 50 years, although it’s more expensive upfront and therefore less common.

To get the longest life out of your roof ensure you check it after inclement weather and be sure to repair it quickly to avoid more damage.

  • Deck: 35 Years :

Depending on the type of wood, your deck can last anywhere from 20–50 years. However, the average deck lasts around 35 years.

Seal your deck and keep up with minor repairs to keep it strong and sturdy for many years.

Interior:

Maintaining the interior of your home can keep it looking stylish and new. Even the most diligent cleaners will at some point have to replace worn out fixtures. Doing so proactively can help you avoid an emergency situation.

  • Carpet: 10 Years

Carpet in your home typically has a 5– 15-year lifespan. It will eventually begin to wear out (in the most traveled areas) and it will need to be evaluated. If you notice it’s starting to look dirty, matted or has a foul odor, it’s time to replace it.

It’s a maintenance best practice to steam clean your carpet often (before it becomes visibly dirty).

  • Faucets and Fixtures: 15 Years

Properly cleaned and maintained faucets and fixtures can last anywhere from 10–20 years. However, if they are not properly cleaned they can last less than 10 years. If you want to make them last, clean out hard water residue often.

  • HVAC System: 20 Years

It’s best to replace your system around 15 years which means saving up the money and having a professional in mind to fix it.

To get the longest life out of your HVAC change the filters often to avoid overworking your system.

  • Windows and Skylights: 30 Years

Windows and skylights last so long that often people forget they need to be replaced at all. Good windows will last most people from 25–35 years or more, but you will know it’s time to change them when they start looking warn, begin to suffer damage or are not insulating your home properly.

Be sure to clean window tracks twice yearly to prevent buildup and prolong their life.

  • Countertops: 15-100+ Years

It’s smart to invest in stone countertops such as granite or quartz because they last so much longer than laminate or cement countertops. Laminate countertops will last anywhere from 10-12 years, while a well-maintained stone countertop can last over 100 years!

Keep your investments safe by avoiding contact with hot surfaces or cutting directly on them. Reseal your stone countertops often and they can last a lifetime.

Appliances:

The appliances in your home are some of the easiest things to fix and some of the more inexpensive to replace. While some people replace appliances as newer technology emerges, it’s most cost-effective to use them for the duration of their lifespan.

  • Microwave: 9 Years

A microwave can last a long time if properly cared for. Usually, they last anywhere from 5–15 years and sometimes even longer depending on usage. When using your microwave, clean it often and avoid slamming the door. Never run your microwave without something inside, as it can cause serious damage.

  • Dishwasher: 10 Years

Depending on the make and model, a dishwasher can last anywhere from 7–12 years. If you start to notice your dishwasher isn’t washing well, give it a good cleaning before giving up on it.
To properly clean it, unscrew the drain and clean the filter monthly to prevent clogging. Once the filter is clean, empty the dishwasher completely (racks and all) and running it with a cup of distilled white vinegar inside it.

  • Washing Machine: 12

The average washing machine lasts between 10–15 years depending on the brand and how well it’s maintained.
To stretch its usable years further, check your washing machines water hoses for signs of wear or weakness a few times each year.

  • Dryer: 12 Years

Similar to your washing machine, your dryer should last anywhere from 10–15 years. If you buy them together, they likely will be ready to replace around the same time. If you notice it’s making strange noises or emitting strange smells, it might be nearing the end of its life.
A good maintenance best practice is to clean your lint trap before every drying session.

  • Oven: 14 Years

Ovens these days will last anywhere from 10–20 years. Don’t wait until you start ruining meals to replace your oven.

To ensure it’s running properly, inspect coil burners for deformities and replace any damaged ones.

Miscellaneous:

There are other household items that may not necessarily be fixtures or appliances but are important and should be maintained nonetheless. Things like your mattress and sprinkler system are more obvious because you use them often. However, smaller things like smoke alarms, fire extinguishers and electrical wiring can cause damage if not properly maintained, so it’s important to keep your eye on them.

  • Mattress: 8 Years

Your mattress is typically used more than most other things in your house and can collect dirt, dust and grime. It’s important to get a new mattress if yours starts to look or smell dirty, or if it’s losing its firmness.

Most people get a new mattress every 7–10 years which is a good rule to follow. Make your mattress last longer by rotating it 180 degrees from head to foot every two to six months.

  • Smoke alarms: 9 Years

Three out of five home-related fire deaths occur in a house that has malfunctioning smoke detectors. It’s important to not only replace batteries every year but to replace the detectors and alarms every 8–10 years.

  • Fire extinguisher: 10 Years

It can be tough to tell how old your fire extinguisher is if you didn’t buy it yourself as some don’t have expiration or purchase dates on them.

A good way to tell if it’s working properly is to check its pressure gauge monthly to ensure the needle is in the green area of the pressure scale. If it’s damaged, has low pressure or you think it might be older than 10 years, it’s probably best to replace it.

  • Sprinkler System: 20 Years

If you’re lucky enough to have a good quality sprinkler system it can last you anywhere from 10–30 years! Take good care of it to ensure you’re on the high end of that scale. Get your backflow checked annually and drain the system of water during the winter if you’re in an area that freezes.

  • Electrical Wiring: 100+ Years

Old wiring can cause serious safety issues for you and your family. The good news is that wiring systems can last a lifetime if properly maintained. Buy an electric socket tester and routinely test your electrical outlets’ voltage.

If you start to notice low voltage, get a tingling sensation when you touch the walls, smell burning anywhere in your home or have ungrounded outlets around your house it might be time to replace it.

In general, as long as you properly maintain your appliances, fixtures and household items you should get fairly long lives out of most of them. If you also save the recommended 1% of your home’s value every year for repairs you won’t be blindsided when a costly repair does need your attention. Use this list to anticipate your product’s lifespans and enjoy stress-free home repairs.

Hug Your Home Challenge – May Tips

If you’ve been keeping up with The Property Geeks 2018 Hug Your Home Challenge then you know we’re almost halfway through the year! If you haven’t been keeping up, it’s not too late to join in. Click here to get your free Hug Your Home Challenge checklist, a year full of home maintenance tips that will get your house in tip top shape. This month it’s all about freshening everything up for Spring.

Freshen Up Your Fan & Filter

How long has it been since you’ve shown your oven hood some love? If your filter looks more yellow than silver and you can’t find a non-sticky place to hold onto, it’s probably time to give it a quick bath. If you’ve got a stainless steel filter, you can just pop it in the dishwasher with your next load. Unfortunately, if your filter is made from aluminum, (as many of them are) you’re going to want to opt for handwashing.

  1. Fill the sink with hot, hot, hot water.
  2. Add 1/4 cup of baking soda and a generous squirt of de-greasing dishsoap like Dawn.
  3. Remove your filter from the vent hood. Most will pop or slide out pretty easily. Submerge it in the hot, soapy water.
  4. Pour yourself a glass of iced tea while the filter soaks. (10-15 minutes at a minimum. More if you’re reading a good book.)
  5. After it’s soaked, scrub the filter with a scrub brush, being careful not to damage it.
  6. Rinse and air dry, then re-install. (Make sure it’s completely dry before you put it back in the vent hood.)

Rejuvenate Your Refrigerator

Hopefully you go through and toss out science projects growing in your refrigerator on a fairly regular basis. But how about giving your fridge and freezer a nice, deep clean? It doesn’t take too much effort and you’ll be thankful for the results since you’ll be able to tell what you’ve got stashed away in there. To give your fridge and freezer a quick, more thorough clean:

  1. Remove everything, including drawers, shelves and bins.
  2. Fill your sink with hot water and a generous squirt of liquid dish soap.
  3. Soak shelves, drawers, etc. in the sink.
  4. Use a soapy rag to wipe down the shelves, sides, and inside door of your refrigerator. If you come across sticky or stubborn spills, mix some baking soda with some water and scrub the spill with that mixture.
  5. Wipe away any remaining soap with a wet rag.
  6. Dry the interior.
  7. Scrub, rinse and dry the shelves, drawers and bins.
  8. Put your food back in place and enjoy!

Wash those Windows

Nothing makes the day a little brighter than having the sun peer in through sparkly, clean windows. In order to tackle this project, you’ll want to wait for a clear day with no chance of rain. Before you do anything else, make sure you mark the window screens. Trying to figure out which screen came from which window isn’t a fun game to play and will add hours to your chore. Then:

  1. Remove screens from all of the windows and lay them flat on a tarp.
  2. With a gentle setting, spray down all of the screens with a hose.
  3. Add a squirt of dish soap and gently scrub the screens with a scrub brush.
  4. Rinse again and let air dry.

Meanwhile, for the windows…

  1. Mix up a solution of 4 cups of water, 1/2 cup of vinegar and a small squirt of dish soap.
  2. Spray on the windows.
  3. Rinse off.
  4. Use a squeegee to wipe it off. If you can’t reach, air drying is fine.
  5. Presto! Now you can actually see outside!

Sign up here for more Hug Your Home Challenge tips and also check in on our weekly episode of #GrillTheGeeks on our Facebook page where we talk about everything going on in the real estate market plus tips for keeping your home in tip top shape!

How to Prepare Your Home for Photography

Few things are more nerve-wracking for our sellers than having to prepare their home for professional photography! After all, 90%+ of people start their home search online and will make snap decisions based on nothing but the pictures. So when you’re selling your home, a picture isn’t just worth 1000 words, it can be worth thousands and thousands of dollars as well.

We picked one of our top pick photographer’s brains for some suggestions on preparing a home for photography. Here are some top tips from Lisa Zampogna of Poppy Seed Photography:


 Clean, clean, then clean some more.

The camera will pick up everything, the good and the bad. Giving your home a thorough deep clean before the photographer arrives will not only ensure you don’t have dust bunnies in your pictures, it will also give you a head start on getting ready for showings. Vacuum the floors and dust your walls, floorboards and vents. Wipe down counters and scrub your sinks until they shine.


Hide your  clutter.

Look through home design and architectural magazines — that’s the look you’re going for. Clear counter tops, empty nightstands, and minimal decor will go a long way in making your home look its best. Potential buyers want to feel like a house has plenty of space for their own personal touches. If your kitchen countertops are overflowing with small appliances, it will make the room feel smaller so hide your stuff. You can keep a basket under the sink and do a quick sweep of the counters before photos or a showing. The slight inconvenience will pay off in the long run.


Depersonalize your pad.

Remove the majority of your family photographs and personal mementos. Buyers want to be able to envision themselves and their family in a house. If they walk through halls filled with generations of your family members, it will be more difficult to think of the house as theirs.


Plan for picture perfect pictures.

Put away anything that might detract from your home’s natural beauty. That means stow high chairs, baby gates and toys in a closet or in the garage. Hide your toiletries in a drawer. No one wants to see your toothbrush or the rumpled towel from your morning shower in a picture. Take a critical look at the outside of your home as it might be seen by a potential buyer. Tuck away hoses, ladders, outdoor toys and tools. They’ll be eyesores in a picture.


Show your home in its best light.

Before your photographer arrives, turn on all of the lights. Make sure light bulbs in the same room have the same tone (daylight vs. warm vs. cool bulbs.) Turn off ceiling fans since they can mess with the lighting and open or raise all blinds and window treatments to allow for the most natural light. Drop your remote controls in a drawer and turn off all electronics and televisions.


Provide a helping hand.

If you can, plan to stick around while the photographer is working. He or she may need some help if they need to move something or tuck an item out of sight. Most of the photographers we work with will do what it takes to make the most of the photos, but they’d prefer a homeowner move their own items so they know where to find them after the shoot is over.

Most of the work is in the prep since photography appointments usually only take about an hour, or sometimes even less. The better prepared you and your home are, the less time the photographer will have to spend on site and in edits.

If you have questions about real estate photography, just reach out via email or on social media and we’ll do our best to get back to you ASAP! And if you’d like a printable checklist of these tips and more, please visit Lisa at Poppy Seed Photography!

5 Ways to Buy a House in a Seller’s Market

Spring market is here but it’s a tough one if you’re on the buying side of a transaction. Inventory remains low and properties are receiving multiple offers within hours of being listed on the MLS. Lucky for you we’ve survived markets like this before and have some tips on how our buyers can come out ahead of the competition.

1. Act fast.

In a market like the current one, speed is of the essence. Houses are selling almost as soon as they hit the MLS. If you’re serious about buying, make sure you have an idea of what you’re looking for so you’ll know it when you see it. Then work with an agent to get set up on an auto search so you’ll know as soon as possible when a property meeting your criteria comes on the market. If something piques your interest, go see it as soon as possible. Even a couple of hours can make the difference between being an only offer or finding yourself in a multiple offer situation.


2. Write a “Dear Seller” letter.

For some sellers, getting the highest price isn’t the most important part of an offer. They may have lived in the house for decades, it might be where they raised their kids, or it might be a cherished parent or grandparents’ home. In a multiple offer situation, they might take comfort in knowing the buyers love the deck they built by hand or appreciate the perennial gardens. A buyer could mention how much they’re looking forward to big family dinners in the gorgeous kitchen, giving the sellers comfort knowing their home is going to someone who will appreciate the same things they loved in their home.

3. Keep it simple.

If sellers are evaluating multiple offers, they’re probably going to be inclined to favor the ones that ask the least of them. If you’re able to, submit your offer without contingencies, especially the sale of another property. If you’re not comfortable excluding all contingencies, make the time periods short. If it’s standard to take two weeks for an inspection, offer to hold one in seven. Don’t try to include any personal property. You may love the granite-topped dining table but if another offer comes in and those buyers aren’t asking for anything, it may make your offer look less attractive.  If other things are equal, the sellers may be swayed to go with the offer that is the least restrictive.


4. Bring your best to the table.

Don’t hold back. If you absolutely love a property, submit your best offer right off the bat, especially if you know you’re in a multiple offer situation. You can also offer a higher amount of earnest money (above the typical 1-2%) to make your offer stand out. If you’re offering over market value and can afford to remove the appraisal contingency, consider using that to your advantage. You can also ask your agent about including an escalation clause. That means that if another offer comes in, you’ll top it by a certain amount up until your max is reached. You’d hate to lose out on a house you love if someone came in a few hundred dollars above you and you didn’t have a chance to increase your offer.


5. Show them the money.

In a tight market, anything you can do to make yourselves look more attractive as a buyer will work in your favor. The vast majority of buyers are pre-qualified for up to a certain amount, but it’s not as common to be fully pre-approved for a mortgage. This means your paperwork is submitted ahead of time and your financials have been verified. It makes you a stronger buyer since there are fewer things that could go wrong when the mortgage company starts submitting paperwork. If you’re able to make a larger down payment, that can work in your favor as well. Ask your agent for other ideas that will make you look like a strong buyer. If two offers are comparable, the seller will typically accept the one with the least amount of risk to them.


We don’t know what the future real estate market will bring, but right now we know buyers need to do whatever they can to make their offers the most appealing. Hopefully some of these tips will help. If you have questions about how to make your offer stand out, give us a call or tune in to #GrillTheGeeks every Thursday at 12pm on our Facebook page where we’ll answer your questions LIVE.


Hug Your Home Challenge – April Tips

Are you ready for Spring yet? Up here in Minnesota we’ve been ready for weeks but Mother Nature isn’t giving us a break! Hopefully we’ll get some warmer weather soon so we can check off the items on April’s Hug Your Home Challenge. If you’re new to the challenge, you can sign up here. We’ll send you a checklist you can use to keep up with your home maintenance all year long. Plus, each month we’ll send you info on that month’s checklist so you’re hugging your home all year long. As for April’s tips, here are a few that will help you get those tasks done in no time at all.

“Unclutter Your Gutters”

Before the spring rains start, take the time to make sure your gutters are clear. You’ve probably got everything  you need on hand: a ladder, a plastic scoop, a hose and a tarp (optional).

  1. Spread the tarp out on the area below where you’re cleaning to catch the debris.
  2. Set up your ladder to start at the far end of a section. Use the scoop to clean out any leaves, pine needles or twigs from the gutter. With the tarp protecting your landscaping, feel free to toss it down below.
  3. Once you’ve got a section done, use a hose to flush out any remaining debris.
  4. You’ll also want to check your downspouts to make sure they’re still directing water away from your foundation.


“Care About Your Air”

It might seem like it will be forever before you need to turn on the air conditioning, but before you know it, you’ll be flipping that switch. The last thing you want is to find out your unit had gone kaput. Make sure your air conditioner is ready to go by performing some easy maintenance.

  1. Check your filter. If it’s clogged or dirty, replace it.
  2. Inspect your outdoor unit and remove any leaves or other obstructions. You can do this by turning off the power and rinsing the unit with a hose or using a ShopVac to suck out the debris.
  3. Make sure all of the air vents inside are open and free of obstructions. Some people believe if they close the vents to a room it will save the air conditioner from having to keep the whole house cool. On the contrary, closing vents forces your unit to work harder so make sure they’re not covered by furniture, drapes or anything else.


“Check Below Deck”

The change of seasons can wreak havoc on a Minnesota basement. Once the snow and ice starts to melt, it will flow wherever it can find a way. Unfortunately, often that means it finds a way into your basement. You can check for moisture a few different ways:

  1. Sometimes it’s as easy as using your nose. If your basement has taken on a musty, moldy smell over the winter, odds are you’ve got some kind of moisture.
  2. Cut a square of plastic wrap (about 12″x12″) and tape it to your concrete floor. Make sure you cover all of the edges so it’s airtight. If you come back in a day or two and notice condensation or moisture under the plastic, you’ve got an issue with a damp basement.
  3. Try using a moisture meter. Make sure you measure in several areas of the basement and at many different heights.
  4. Your fix for moisture in the basement will vary depending on the source. To help keep water from entering, make sure your foundation plantings drain away from the house, not toward it and that your gutters and downspouts are directing water away from the house.

Hopefully our tips will help you get ready for Spring… when and if it ever arrives!

Cabins

Top 5 Things to Consider When Cabin Hunting

Cabin on Blake

Can you feel it in the air? The chill isn’t quite as cold, the snow is starting to melt. We’ve all got CABIN FEVER and in more ways than one. Not only is everyone eager for the weather to finally warm up so we can spend some time outdoors, but it’s also prime cabin hunting season. If you’ve ever thought about buying an “up north” cabin, a cozy getaway in the woods or a lakeside vacation home, now’s the time to start looking. To help you get started, here are our top 5 things to consider when starting your cabin search:

 Minnesota vs. Wisconsin

The great debate… Ask 50 people whether it’s better to buy a cabin in Minnesota or Wisconsin and you’ll get 50 different reasons why they suggest one over the other. Both have their pros and cons. Lucky for us, we have easy access to both. In our experience, here are some of the top differences. In Minnesota you have cheaper taxes but more expensive real estate. Larger lakes are more common, but they’re busier. In Wisconsin you typically have an easier drive since you avoid all those folks jamming the highways on Friday afternoon and the lakes don’t seem quite as crowded. It really boils down to personal choice.

Map

Location

How far do you want to have to drive to your weekend/seasonal/vacation place? Awesome options within a ninety-minute drive of the metro tend to fly off the market fast. If you’re willing to expand your search beyond a two-hour range, you could find some gems. It’s also a wise idea to keep traffic patterns in mind. Will you be traveling back and forth on Friday and Sunday afternoons? If so, your commute time can double if you get caught up in the weekend migration of thousands of other cabin-goers. If your availability to take time off is somewhat flexible, it might not be as big of a concern.

The Lake

Cabin

Not everyone wants a place on the lake, but the vast majority of our cabin-hunting clients sure do. If you’re angling to be on the water, make sure you know what kind of water you want…a big recreational lake or a quiet retreat? A private lake with no public access or a place with boat-up restaurants? Do your research by asking friends if they know of anyone on the lake you’re looking at. Check the Minnesota Department of Natural Resources website for their Lake Finder tool to get data on the size, water quality, invasive species and more. In Wisconsin you can visit the Wisconsin Department of Natural Resources for the same type of information. Our best tip for getting the lowdown is to talk to locals in the area. Visit with the clerk at the gas station or the bartender at the local bar. They’re the best source of info.

The Lot

Shorelines can vary from flat and sandy to steep and rocky and everything in between. Do you want to walk out of your cabin and have to trek hundreds of steps down to the dock? Do you want a ton of shade or do you prefer a smattering of sun? Are you looking for privacy or do you want to be in the middle of the action? There are quite a few criteria to take into account when considering what kind of property you want. You also have to keep in mind the local zoning ordinances which can be pretty strict along the shore. If you have any inkling that you might want to make some changes to the structure or add any additional buildings you should check with the county before you sign on the dotted line. Some might have setbacks that need to be followed or rules that you can’t rebuild existing structures if they’re within a certain distance of the water. You also want to find out about the water and waste system. Usually you’ll have a well and some sort of waste disposal system like a septic or holding tank. Make sure you know what you’re getting into on the front end so it doesn’t count you a ton of dough down the road.

Finally, the Cabin

It may seem like we left the most important item for last. But really, in our experience, while the cabin is important, it’s not THE most important item to consider. In geek terms… “You can usually change the cabin, but you can’t change where it’s located.” So really, finding the right combination of distance, lake and lot is the hard part. Typically the cabin can be changed or adjusted to accommodate your needs if everything else on your wish list aligns.

So who’s ready to start looking for a vacation property? If you’re interested, give us a call! We have agents who specialize in cabins and many of them are licensed in Minnesota AND Wisconsin so we can help you no matter which side of the state line you decide to buy on!

Hug Your Home Challenge – March Tips

Two months down and only ten to go in The Property Geeks 2018 Hug Your Home Challenge. We’re working our way through a year full of home maintenance tips and tricks. If you haven’t signed up, there’s still plenty of time. Join in here!

If you’ve been keeping up, it’s time to tackle March’s list right now. We’ve got a few tips and tricks to take on those tasks. Let’s get started with one of our least favorite jobs… cleaning out the oven!

“Give Your Oven Some Lovin'”

Do you know anyone who loves to clean their oven? Sure, they enjoy it once it’s clean, but does anyone ever look forward to scraping the baked on goo and grime off the bottom of their oven? If you know of someone, send them our way! For the rest of you, this is one chore where the anticipation is actually worse than going through the motions. Follow these steps and your oven will sparkle with minimal effort:

Oven

  1. Fill your bathtub or a large basin with warm water and a scoop of dishwasher detergent. (If you’re using your bathtub, you may want to put an old towel down first so it doesn’t get scratched.)
  2. Remove your oven racks from the oven and let them soak for several hours in the tub.
  3. Make a paste with baking soda and water.
  4. Spread the paste over the inside of your oven with a nylon scrubber or sponge.
  5. Let it sit for several hours or overnight.
  6. Wipe off the dried paste with a wet sponge.
  7. Scrub the oven racks, rinse and let dry before returning them to the oven.


“Return the Spring to Your Shower”

Even if you don’t have hard water, mineral deposits and sediment can build up on your shower head. Your water pressure can be affected and you might even see a rogue stream of water shooting off in a random direction. Never fear. Cleaning off your shower head is super easy and you probably already have everything on hand.

  1. Fill a plastic bag with white vinegar.
  2. Slip the bag over your shower head, making sure it’s submerged in the vinegar, and secure in place with a rubber band or tape. (Make sure you don’t get tape on the metal.)
  3. Leave in place overnight.
  4. Remove the bag and scrub around the shower head, especially the holes, with an old toothbrush.
  5. Run clear water to rinse and ta-da — you’ve got a sparkly, free-flowing shower!

“Clean Up Those Coils”

Refrigerator

Your refrigerator is probably one of the hardest working appliances in your home. It doesn’t require much maintenance, but if you can remember to dust or vacuum the coils every so often, it will improve the efficiency of this much-loved appliance. The first step to cleaning up those coils is to figure out where they are. Typically, coils are located in a massive grid on the back of the refrigerator. If that’s the case with your model, simply unplug it from the wall then gently vacuum or dust any build-up from the coils. Some models may have the coils on the bottom. Again, unplug your appliance from the wall then look for either a plate in front of the refrigerator or one in back. Remove the cover and carefully dust or vacuum the coils. Once your refrigerator is dust-free you can plug it back in and pat yourself on the back for crossing another home maintenance task off your list.

Be sure to join us on our Facebook page where we’ll share other tips and tricks for tackling your home maintenance tasks! Until next time, keep hugging your home!

Hug Your Home Challenge – January Tips

If you’ve been keeping up with The Property Geeks you’ve probably heard us talk about the 2018 Hug Your Home Challenge. It’s a chance for all of us to stick together through a year full of home maintenance tips and tricks. If you haven’t signed up, there’s plenty of time. Join in here! For those of you following along, we’re working through January’s list right now. It’s full of exciting things like “Clean Your Ceiling Fan Blades” and “Touch Up Interior Paint.” If you’re like us, you know those things are important to do, but not exactly the most desirable way to spend an hour of free time. We’ve got some tips here on how you can knock off a good portion of our checklist as quickly and easily as possible. Let’s start with the dreaded garbage disposal…

“Ooooh, What’s that smell?”

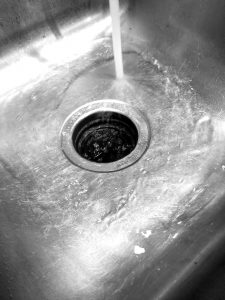
Ever notice a funky little smell drifting up from your kitchen sink? Maybe it’s that tuna melt sandwich you just put down the drain. Or maybe it’s time to show your hardworking garbage disposal some love. There are many ways to clean the garbage disposal and if you do a quick search on Pinterest you’ll be bombarded with options. Our best advice comes from Property Geek Karla who suggests the following:

  1. Slice up a lemon and send it down the disposal.
  2. Follow that with a cup of ice.
  3. Next, measure out a cup of vinegar and pour it down the sink.
  4. Presto! You’ve got a sweet-smelling disposal.


“Don’t Hit a Wall with the Walls!”

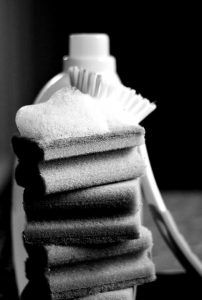
Do your walls and baseboards have a magnetic-like attraction to dust and grime? There are several different ways to fight back, depending on the level of effort you want to put forth. Here are a couple of ideas:

  1. Dust your walls with a microfiber mop.
  2. Mix up a batch of ammonia and water then wipe down the walls and baseboards with a damp cloth.
  3. Use a Magic Eraser for stubborn stains or marks but be careful — it might remove the paint finish.
  4. Use a toothbrush or cotton swab to get into the corners and tight spots on your baseboards.
  5. To cut down on future work, run a dryer sheet over your baseboards. It will repel dust.


“Shower your Shower Curtain with Love”

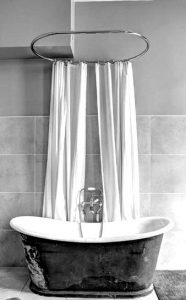
Do you ever get the feeling it would be better to go with a gray shower liner instead of battling the mildew that collects on that once-pristine white one? The battle against mildew and mold can be won. Just wash your shower curtain with salt. Salt? Yep. Regular table salt will do the trick. Here’s how:

  1. Toss your shower curtain, liner and a couple of towels into the washing machine.
  2. Use 1/2 the amount of detergent and toss in a cup of vinegar or use the regular amount of detergent with 1/2 cup of baking soda and 1/2 cup of vinegar during the rinse cycle.
  3. Add a cup of salt to a tub of water and soak shower curtain/liner for several hours.
  4. Hang to dry.
  5. No more mold and mildew!


Enjoying our tips? Sign up here for our 2018 Hug Your Home Challenge and get our annual checklist plus monthly reminders of “to-do’s.” You can also follow us on Pinterest where we’re pinning our favorite tips. And make sure you join us at 12pm CT on our Facebook page for #GrillTheGeeks. Every Thursday we talk about home buying and selling and answer your real estate questions. This week Property Geek Karla will be talking about more home maintenance tips you can use to knock off that January checklist!